This step by step explanation of the front view of a forehand counterhit is a companion article to the Forehand Counterhit – Side View article, so I will focus on discussing those aspects relevant to the front view, rather than just repeating all the same information.
In the forehand counterhit against light to medium topspin, the idea is to hit the ball over the net with medium speed and a little topspin to help bring the ball down on the other side of the table.
Ready Position
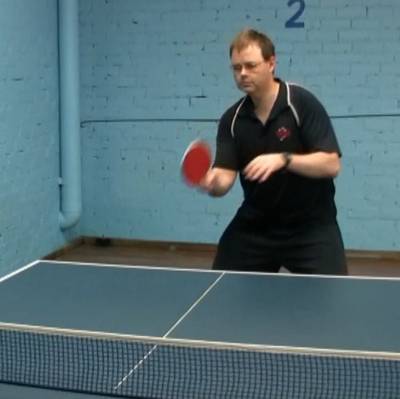
Points to look for:
- From this perspective, it will be easier to see how the free arm tends to only be moved by the turning of the waist and shoulders, and is used to help balance the player. Most top level players will move the free arm in this manner, which is sometimes called the “handcuff effect”, since for much of the stroke both arms and hands move as if they were handcuffed together. The presence of the handcuff effect means that the player is turning his torso from the waist, ensuring that both shoulders are moving in unison.
- As you move through the photographs, notice that this particular player does not lower his free hand when he lowers his playing arm during the back swing. This is not uncommon – some players will lower their free hand to the same height as the playing hand, while others do not. Provided the free arm is being moved in relative sync to the playing arm, the height of the free arm is not that critical.
- The dipping of the right shoulder of the player is not unusual, but it is exaggerated a little in this photograph since the player is in the middle of a forehand drill, and knows that the ball is coming to his forehand, and so he is cutting corners a little in his recovery from the previous stroke.
Start of Backswing
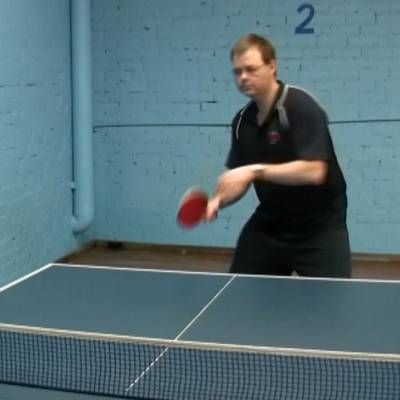
The ball is coming to the forehand side and the decision has been made to play a forehand counterhit. The backswing begins the stroke.
Points to look for:
- The hips, waist and shoulders are starting to turn to the player’s right, rotating both arms.
- The bat is being lowered into a position that will be around 6-9 inches below the height of the intended contact point. This will allow the player to swing forwards and upwards.
- The player’s head is relatively still, since the ball is still far away and he is watching the ball approach.
End of Backswing
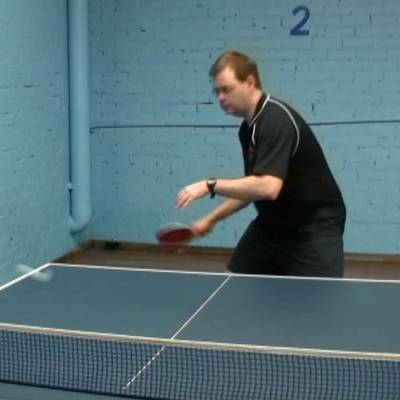
The ball has bounced on the table, and the backswing has finished.
Points to look for:
- The free arm has continued to rotate as the hips and torso are turned. It is possible to see how the free arm is pointing in the general direction of where the ball has bounced on the table. Many coaches advise new players to “point at the ball” with their free hand, in order to encourage this positioning of the free arm during the stroke.
- The difference in heights between the free hand and playing hand is clear from this perspective, and is caused by the dipping of the right shoulder and lowering of the right forearm. The free hand could be at the same level as the playing hand, and it would not make a huge difference in the execution of the stroke. The rotation of the free arm is more important than the exact height the free hand is held at.
- The right hand is at a height that is a little lower than the expected maximum height of the bounce of the ball.
- The player continues to watch the ball closely, which now requires the player to turn his head. The head is rotated but not lifted or dropped. When performing this stroke, it is recommended that you turn the head to look at the ball, instead of keeping the head still and attempting to use your peripheral vision.
- Note that the tip of the racket head is pointed out the the player’s right, rather than pointing up or down. If the player was about to play a stroke with more topspin, the tip would be pointing downwards more, since the wrist snap would be used to add to the amount of spin. It is not recommended to have the racket tip pointing upwards, since this usually indicates too much tension in the wrist and forearm.
Start of Forward Swing
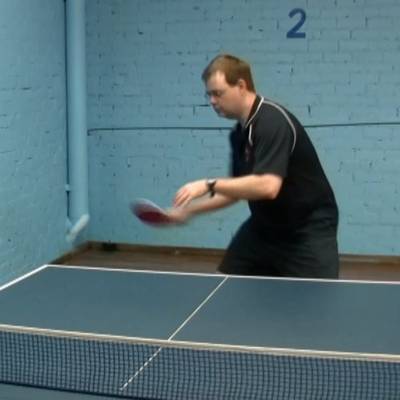
The ball is now bouncing upwards, and the player is beginning to swing forward at the ball.
Points to look for:
- The head has come into focus in the photograph, since it is no longer turning.
- The playing elbow is several inches away from the body, giving the player plenty of room to swing without being cramped in his stroke.
- The use of the wrist by the player is shown by the blurring of the racket tip, in comparison to the lesser blurring of the playing hand. Some players will use very little wrist in a forehand counterhit, while others (such as the player pictured) tend to use a little more. It is mainly a matter of personal preference – using the wrist will add a little bit of speed and spin at the expense of a little bit of consistency.
Pre-Contact With The Ball
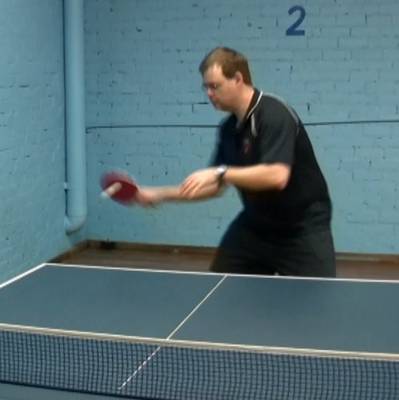
The player is about to make contact with the ball.
Points to look for:
- From the path of the ball, it is possible to see that the player has made contact with the ball while it is still rising. This is because the player would rather make contact at a comfortable height for his natural swing, and also because in order to hit the ball at the peak of the bounce, he would need to move a little further away from the table in order to hit the ball in the same position relative to his body.
- Note that the tip of the racket head is now pointing around 30-45 degrees upwards, instead of straight to the side. This confirms that the player has used some wrist during the stroke, but not a large amount.
- The free arm is now starting to move, as the waist and shoulders are turned back to the player’s left.
Contact With The Ball
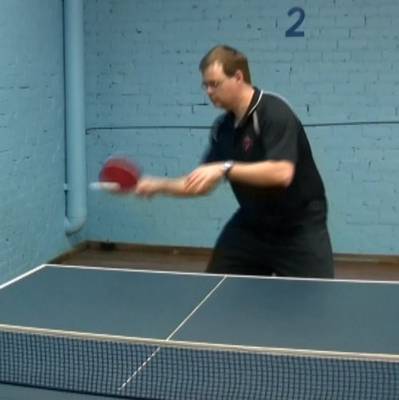
Contact has been made with the ball.
Points to look for:
- The player has watched the bat contact the ball.
- The tilting of the racket has changed the flight path of the ball to a much flatter trajectory in the opposite direction.
- The “handcuff effect” is quite evident in this photograph.
Start Of Follow Through
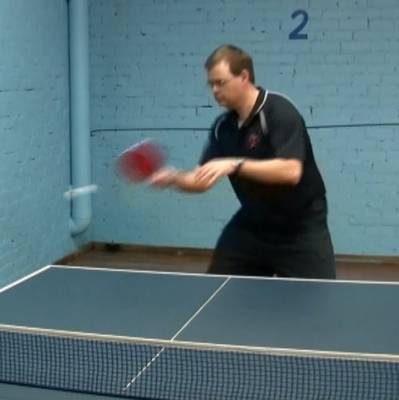
The ball is now well on its way, and the player has started his follow through.
Points to look for:
- The racket is now beginning to move towards the player’s left, as the player continues to turn back towards that direction.
- Compare the blurring of the racket tip to the relative stillness of the player’s right elbow. In essence, the player is performing a saluting type motion with his playing hand, while at the same time turning his body back to his left.
Middle Of Follow Through
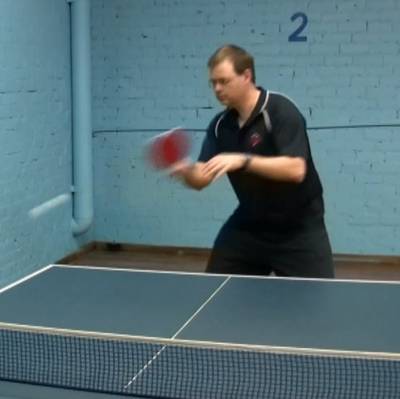
The player is now in the middle of his follow through, and the ball is approaching the net.
Points to look for:
- The racket tip is now pointing upwards, as the playing hand moves towards the natural end of the saluting motion.
- The player’s right forearm is now pointing at the ball, since the turning of the waist and shoulders has brought the player’s upper body back close to its starting position.
End Of Follow Through
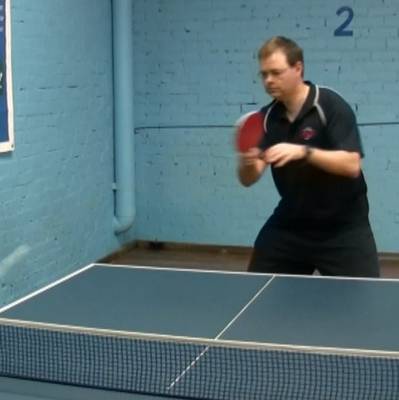
The forward swing has come to an end, and the ball is on its way over the net.
Points to look for:
- The racket has finished with the tip of the racket head pointing almost straight up, which is the end of the saluting motion.
- The free arm has not moved much further, so the racket has narrowed the distance between them. This is because the player does not need to move his free arm past this point in order to maintain balance. In a more powerful stroke (such as the forehand loop), the free arm might be moved further to the player’s left in order to help the player stay balanced.
Return To Ready Position
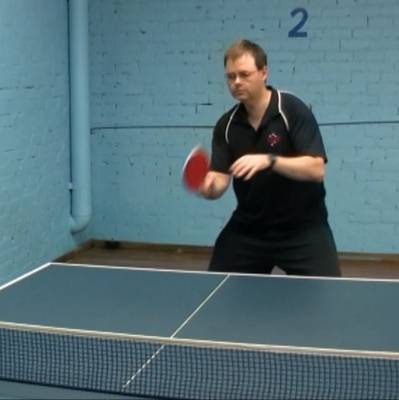
The player has returned to his ready position before the next stroke.
Points to look for:
- The player only had to let his playing hand drop a little to have his bat back into the ready position.
- The player had finished his stroke in a balanced position, making it easy to get ready for his next stroke, since his body weight was already evenly distributed on both legs.
- The player is now watching his opponent, in order to make it easier to determine the type of stroke his opponent will play, and its location.

