This step by step explanation of the front view of a backhand push is a companion article to the Backhand Push – Side View article, so I will focus on discussing those aspects relevant to the front view, rather than just repeating all the same information.
In the backhand push against light to medium backspin, the idea is to hit the ball over the net with slow to medium speed and a little backspin to help you control the ball, and make it difficult to attack.
Ready Position
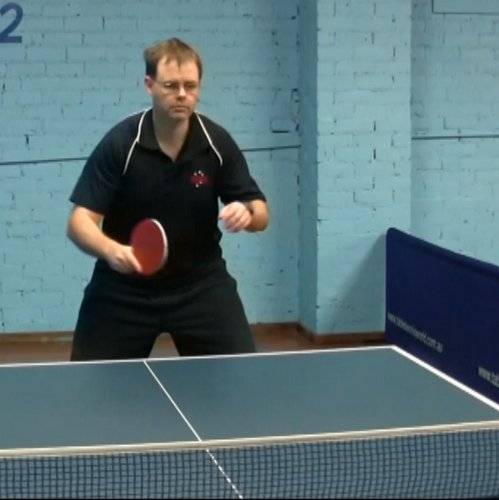
© Greg Letts
Points to look for:
- Since the player is in the middle of a backhand push drill, he is “cheating” a little by not recovering to a neutral ready position, but is instead holding his racket in a slightly backhand position. It would be better if his racket was pointing a little more to the right, and if his playing hand was in line with his right hip.
- The arms are held roughly shoulder width apart, with around a 90 degree angle at the elbow. The bat should be above the table to allow easy stroking of short balls.
- As the playing is performing a basic backhand push drill, he is standing a little closer to the table (around a foot or so) than he would during a match, where he would not be certain about what shot his opponent is going to play. A more advanced drill would have the player move out to the depth used in a real match after each stroke, and then step in for each new stroke.
Start Of Backswing
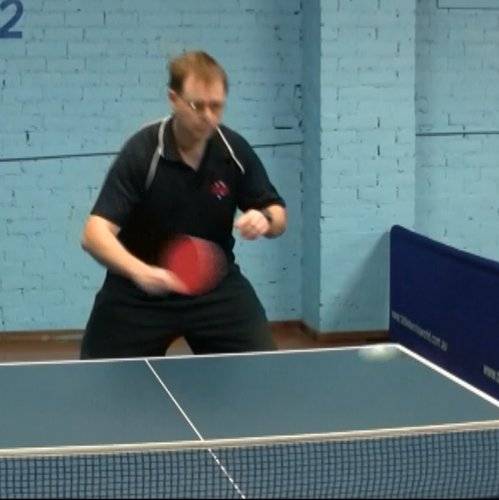
© Greg Letts
The ball is coming to the backhand side and the decision has been made to play a backhand push. The backswing begins the stroke.
Points to look for:
- Since the player has judged that the ball will bounce only a little to his left, he has decided not to shuffle step or one step to his left, and instead has leaned his body weight onto his left leg.
- The player is bending forward a little from his waist, and at the same time lowering his body by bending his knees when leaning to his left.
- The right elbow has moved forward a few inches, and the right hand and forearm have been swung a few inches around the elbow joint to the player’s left and downwards.
- The free arm will not move significantly throughout the stroke, and will be used mainly to help maintain balance.
End Of Backswing
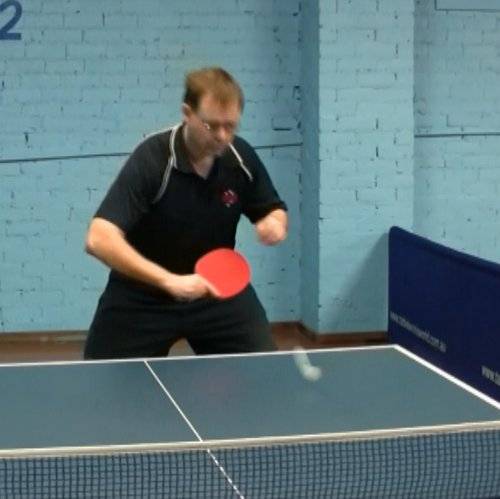
© Greg Letts
The ball has bounced on the table, and the backswing has finished.
Points to look for:
- The player has cocked his wrist back a little, since he intends to use his wrist snap to add to the amount of backspin he imparts on the ball.
- The playing elbow has not moved much further, but the right forearm and hand have continued to turn around the elbow joint, bringing the racket directly into the ball’s line of travel.
- Contact will be made between the player’s left hip and middle of his torso, not to the side of the body as performed when forehand pushing, as you can see from the comparison photograph in the link.
Pre-Contact With The Ball
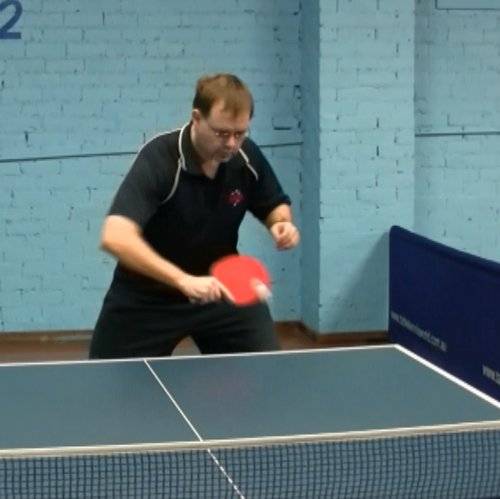
© Greg Letts
The player is has swung his racket forward, and is about to make contact with the ball.
Points to look for:
- The player has finished moving into position just after finishing his backswing, and now he is still as he swings forward, as shown by the lack of blurring of his head and torso in the photograph.
- The player is performing a light backspin push with low speed, and as such there has not been a large backswing, and there will also be a relatively small follow through.
- Note that the right arm is not being straightened in order to punch the ball, but the racket is being swung from the elbow. There is almost no movement of the upper arm around the right shoulder at this point.
- The player is also tracking the ball as closely as possible with his eyes, and has lowered his head in order to make this easier.
- The player is in a well-balanced position at this point, with a stable body and head, which increases the chances of making a successful stroke.
- The wrist is just starting to snap gently forward. The player will be looking to achieve maximum speed just at the moment of contact, even though the stroke will not be very powerful. Note that in this case, maximum speed means that the racket will be moving fastest at the time of contact, not that it is the fastest possible racket speed that the player could achieve.
- More advanced players will sometimes snap the wrist before contact or after contact in order to attempt to deceive the opponent about how much spin has been imparted to the ball, since the opponent will hopefully think there is more spin on the ball than there actually is.
Contact With The Ball
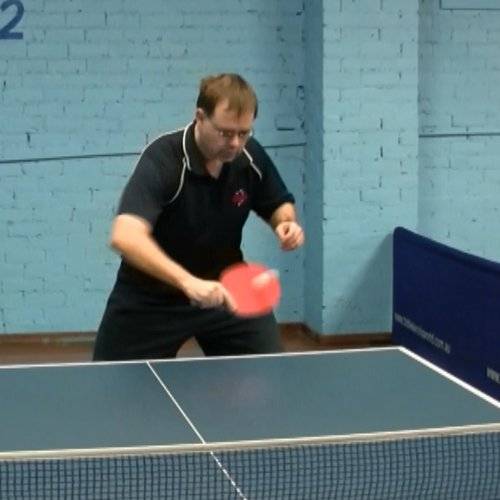
© Greg Letts
Contact has been made with the ball.
Points to look for:
- The player has watched the bat contact the ball.
- The player has not put all that much backspin on the ball, as shown from the upwards trajectory of the ball from his racket. A ball with heavy backspin would have a much flatter trajectory.
- The racket is still being swung around the playing elbow, and being moved forwards and slightly downwards. Note that the wrist snap is not being used to change the racket angle, but to increase the speed of the racket as it moves around the playing elbow, in order to impart more spin. This provides more spin with less chance of making a mistake, since the racket angle is not changed.
Start Of Follow Through
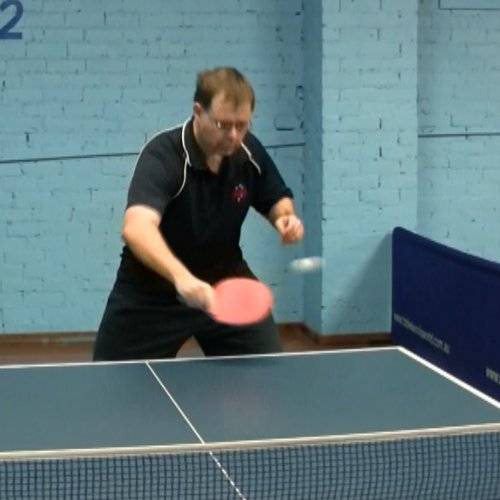
© Greg Letts
The player is beginning his follow through, and the ball is on its way towards the net.
Points to look for:
- As the racket reaches the end of where it is comfortable for the player to swing forward, he allows the racket to keep moving in a natural direction around the elbow joint, moving it towards his right.
- The playing elbow is straightened just a fraction at this point. It isn’t strictly necessary to do so, but it happens because the player is attempting to swing his racket towards the target for as long as possible, which causes the elbow to straighten a little after contact, keeping the racket moving forward for a few more inches.
- By comparing the position of the tip of the racket head to previous photographs, it is possible to see that a little wrist snap has been used to add to the speed of the racket head as it moves around the elbow joint.
End Of Follow Through
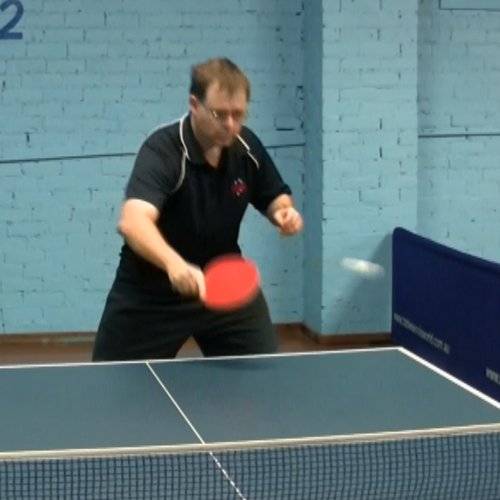
© Greg Letts
The follow-through has come to an end, and the ball is on its way.
Points to look for:
- The follow through had almost ended in the previous photograph, as shown by the almost identical position of the free arm, which has only moved due to the player starting to straighten up. At this point the player is actually starting his recovery for the next stroke.
- In this gentle push stroke, the whole racket has only been swung forward about a foot to eighteen inches or so.
Start Of Return To Ready Position
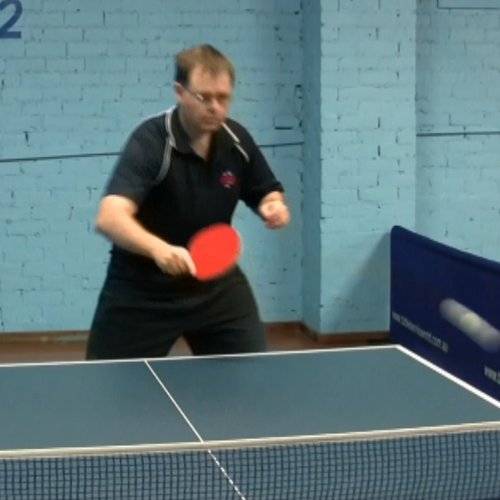
© Greg Letts
The player is in the middle of his recovery for the next stroke, and the ball is traveling over the net.
Points to look for:
- The player is continuing to straighten up his upper body, and is also just starting to push off his left leg to bring his body weight back to an even distribution on both feet.
- The right elbow is being turned a little to the player’s right, in order to straighten up his racket so that the racket face is perpendicular to the floor, and at the same time the right hand is being swung around the elbow a few inches to the player’s right, to return the racket to its original ready position as quickly and efficiently as possible.
Return To Ready Position
© Greg Letts
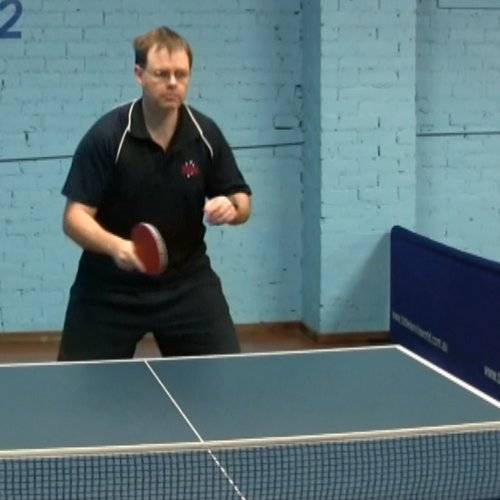
The player returns to his ready position before the next stroke.
Points to look for:
- The player has finished pushing off his left leg, and is now back in his original ready position.
- Since he knows the next ball is coming to his backhand side (he is performing a backhand push drill), he is being a bit lazy and neglecting to bring his racket all the way back into a true neutral position, where his bat would be around his right hip in terms of a left/right position, and the racket tip would be pointing almost parallel to the centre line of the table. A good player would only recover to a position similar to that above if he could read the opponent’s body language and was able to anticipate a return to his backhand side.

