Signed, Sealed, and Delivered!

© Greg Letts
Nothing beats that feeling of holding a brand new table tennis blade in your hand, fresh from the packaging. It’s a thing of beauty, all clean and smooth, and you want to keep your blade that way for as long as possible, don’t you? In this article I’ll outline some tips on how to seal your table tennis blade so that the surface stays in mint condition throughout the blade’s life.
Why Do You Need to Seal Your Table Tennis Blade?
Why should you bother sealing your ping-pong blade? After all, it’s a messy and fiddly process, so is it really worth it?
Rest assured that it is. If your blade isn’t sealed, you run the risk of pulling wood splinters from the surface every time you remove a rubber. Since most of us change rubbers every 3 to 6 months (not to mention the speed gluers who remove the rubber every time they play), if you don’t seal your blade you can end up with a playing surface that looks like someone has been gouging it with a nail file – not a good thing!
Even those players who use glue sheets aren’t immune to pulling wood splinters from the playing surface – believe me I know. I managed to do exactly that when using a glue sheet on an unsealed Butterfly Matsushita Pro-Special that was only a week old – it brought tears to my eyes! Especially since I should have known better, but I thought I would get away with it. Wrong!
How to Seal Your Table Tennis Blade
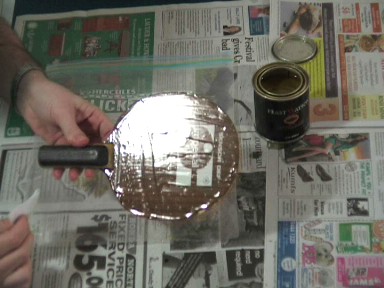
I’ve included a 6 minute video demonstrating my technique of sealing a table tennis blade, which has worked well for me in the past. So watch the video first, and I’ll also recap the main points for the video below.
How to Seal Your Table Tennis Blade – Video Recap
- Ordinary sanding sealer or polyurethane are both suitable for sealing blades. Both can be easily obtained at any hardware store. I’ve read that some players use hairspray, but I believe that it needs to be reapplied every so often, so I wouldn’t recommend that myself.
- Don’t do the sealing in an enclosed room – the fumes are pretty noxious. Get plenty of ventilation going.
- It’s a messy process – the sanding sealer or polyurethane tends to spill and drip a lot – at least when I do it! So use plenty of newspaper underneath to soak up spills so they don’t get on your table or carpet. I also use a plastic bag or sheet on top of the newspaper to catch the drips, so I can reuse them (make sure the plastic is clean, or you’ll be spreading dirt on the blade).
- Make sure the surface of the blade is nice and clean, you don’t want lumps in the surface where you have sealed over bits of dirt.
- Use plenty of sealer or polyurethane, it’s important to get full coverage of the blade. You can always sandpaper off any excess later.
- Check the coverage of the sealer by holding the blade to the light at an angle, so you can see the light reflecting off the liquid on the blade. It makes it easy to see where you have missed spots.
- Don’t forget to seal the edge of the blade, but don’t bother sealing the handle, or else you might find it getting slippery when you play.
- If you use polyurethane, you might need to do a bit of light sandpapering after the sealer dries, to roughen up the surface just a fraction so that the rubber will stick to the blade. Otherwise it can be a bit too slippery, and your rubbers will peel off by accident too easily. I’ve found that sanding sealer doesn’t really need sandpapering, it sort of sinks into the grain of the wood more.
- Prop up the blade securely after spreading the sealer, so it doesn’t fall over onto the table or your floor.
- Take your time. You are going to be using this blade for a long time (hopefully), so take a little extra care now to get the job done right.

